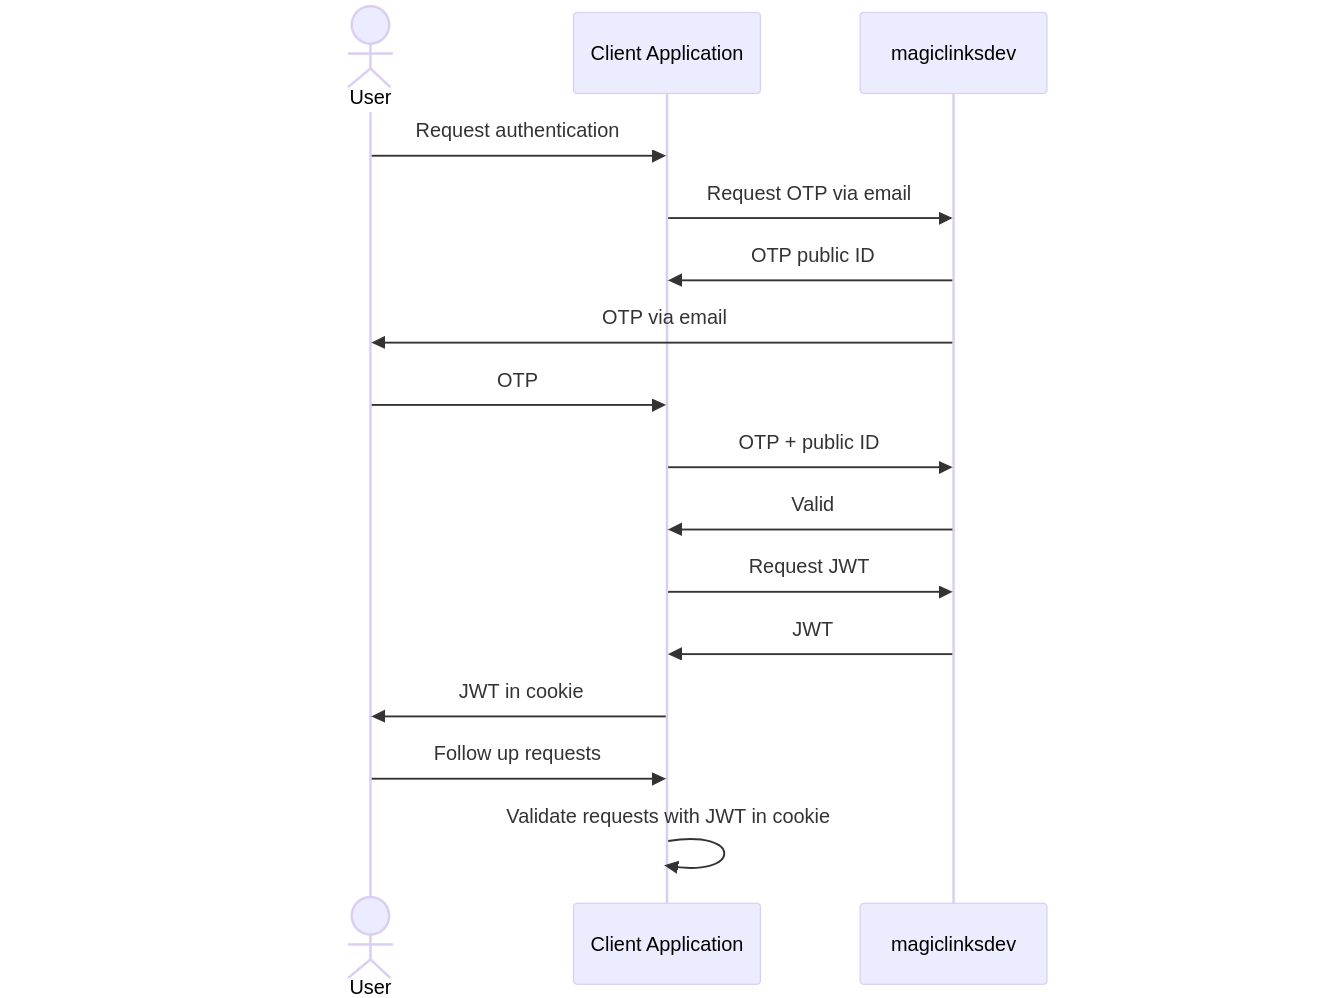
Client OTP Workflow
magiclinksdev is an authentication project. It is essential to perform the correct steps in the correct order for authentication to be secure. This page describes the suggested authentication workflow when using a One-Time Password (OTP).
Definitions
- Server - The instance of the magiclinksdev being used.
- Service account - An account on the server with programmatic access to the server's API.
- Client application - The application using magiclinksdev for authentication. It has a service account.
- User - A person using the client application.
Workflow
- Client application requests an OTP
- User inputs an OTP into the client application
- Client application validates the OTP
- Client application treats the user as authenticated
Suggested OTP Workflow

Step 1: Client application OTP request
A user initiated action causes the client application to request an OTP from the server. Currently, there are two types of OTP requests. See 1A and 1B.
1A: Email directly to the user
The client application makes an OTP email create request. This involves specifying the values for creating the OTP and email template.
Upon processing the OTP email create request, the server will send the OTP directly to the user via email.
It is recommended that the client application add UI text to remind the user to check their email for the OTP.
The OTP and OTP ID will be sent to the client application in the response.
The OTP ID needs to be saved by the client application. It will be needed to validate the OTP. The OTP ID is a public identifier and is safe to save to web browser cookie or other client-side storage.
The OTP can be safely ignored. Only use the OTP in the response if the user should be sent the same OTP via a custom alternative secure channel. Never present an OTP to an unauthenticated user.
If a request is going to trigger an email, perform basic validation, rate limit, and use a service like reCAPTCHA to filter spam and bots.
1B: Custom delivery
The client application makes an OTP create request.
The OTP and OTP ID will be sent to the client application in the response.
The OTP ID needs to be saved by the client application. It will be needed to validate the OTP. The OTP ID is a public identifier and is safe to save to web browser cookie or other client-side storage.
After the request is processed and the response is received, the client application is responsible for sending the OTP to the user through a custom secure channel. An example would be a mobile push notification.
To prevent confusion, it may be best to add UI text to inform the user of the following:
- The user should check the platform where the OTP sent.
- OTPs can only be used once.
- OTPs expire after a specified time.
- OTPs should not be shared with anyone.
Step 2: User inputs an OTP into the client application
The client application must provide a way for the user to submit an OTP for validation. The client application is responsible for associating the OTP with the OTP ID that was saved in the previous step.
Step 3: Client application validates the OTP
When a user inputs an OTP into the client application, the client application should make an OTP validate request. This requires both the OTP and the OTP ID.
If the HTTP status code from the server is 200 OK, then the client application should treat the user as authenticated. Any other HTTP status code should fail authentication.
If a request is going to trigger an OTP validation, perform basic validation, rate limit, and use a service like reCAPTCHA to filter spam and bots.
Step 4: Client application treats the user as authenticated
After the client application has validated the user's OTP, it should treat the user as authenticated. This means the user should have access to the resources they are authorized to.
Since OTP validation does not produce a JWT, it is recommended that the client application perform a JWT create request for any user newly authenticated with a valid OTP.
For web apps, see JWT browser cookie recommendations on the implementation tips page.
Want to say thanks for writing up the docs? Support the project financially? Consider becoming a GitHub Sponsor.