
Workflow
magiclinksdev is an authentication project. It is essential that client applications perform the correct steps in the
correct order to ensure the authentication process is secure. This page describes the workflow from the perspective of a
client application.
Suggested Email Workflow
Terminology
- Server - The instance of the
magiclinksdevbeing used. - Service account - An account on the server with programmatic access to the server's API.
- Client application - The application the reader is developing. It has a service account.
- User - A person using the client application.
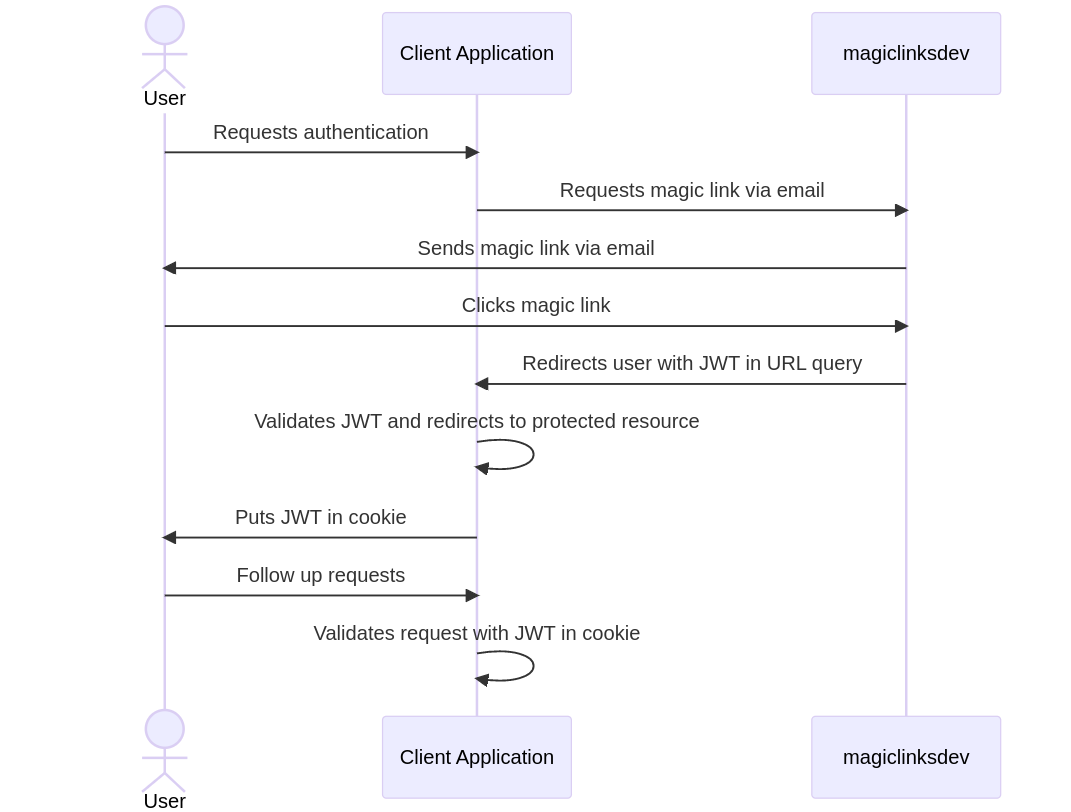
Workflow
- The client application requests a magic link from the server, and it is sent to the user.
- The user clicks the magic link.
- The user is redirected to the client application with a signed JWT.
- The client application validates the JWT.
- The client application marks the user as authenticated.
- The client application refreshes the user's JWT periodically. (Optional)
Client application design considerations
- Magic links can only be used once.
- There is a server-side limit to how long magic links exist before they expire.
- There is a server-side limit to how large JWT claims can be.
- There is a server-side limit for JWT expiration durations.
- Raw JWT claims are stored on the server's database. These claims are encrypted by default. However, it would be best to create JWT claims that do not contain sensitive information such as email addresses, especially if your store JWTs on your users machines, like in a cookie.
Step 1: Request a magic link
The client application requests a magic link from the server. Currently, there are two ways of doing this:
- Request the link be emailed to the user.
- Request the link be sent back to the client application.
For information on how to perform these requests programmatically, please see the Specification documentation or the documentation for the client SDK you are using.
Email the magic link
If the server is configured to do so, the magic link can be sent to user via email. For this request, the client application is responsible for providing:
- The user's email address.
- How the email template should be filled out (subject, body, etc).
- Information about how to craft the JWT.
- Information about how to craft the redirect URL.
- Metadata about the magic link itself, like when it expires.
The server will use the service account's information to template a few other things, such as the logo or the name of the client application.
It is essential that the correct user email address is provided.
Be sure to inform you users to check their email when you've sent them a magic link.
Send to client application
The magic link can be sent back to the client application. For this request, the client application is responsible for providing:
- Information about how to craft the JWT.
- Information about how to craft the redirect URL.
- Metadata about the magic link itself, like when it expires.
After the client application has the magic link, it is responsible for securely sending it to the correct user through a separate channel. Some examples of this would be a push notification or a chat message (like Slack or Discord).
For each magic link sent, it may be best to inform your users of the below points:
- You have sent them a magic link through a separate channel in order to authenticate.
- The magic link can only be used once.
- The magic link expires after a certain amount of time.
- The magic link should not be shared with anyone.
Step 2: Users clicks the magic link
When a user clicks a magic link, they are directed to the server. The server will check the secret in the magic link, then craft and sign the JWT the magic link was configured for. The server will then automatically redirect the user to the client application with the signed JWT in a URL query parameter.
Step 3: Client application accepts redirect
The client application must be listening via HTTP(S) at the redirect URL provided when the magic link was configured.
When a request is received, the user's JWT should be extracted from a URL query parameter. The name of this URL query
parameter could have been provided when the magic link was created. The default name is jwt.
Step 4: Client application validates the JWT
This is a crucial step where developer attention is required. The client application must validate the JWT properly.
The magiclinksdev server publishes a JWK Set at /api/v1/jwks.json by default. The public keys used to sign JWTs live in
this JWK Set. It would be ideal to refresh the JWK Set at least once an hour. It is essential that the JWK Set is
downloaded using HTTPS.
Every API client needs to validate the aud claim in the JWT. This is essential to prevent a malicious service
account from requesting a signed JWT for a different service. Every service account has at least one aud
given on creation. The iss claims should be checked too. The iss claim is specific to the configuration of the
magiclinksdev service, typically the URL.
The JWT validation endpoint
The magiclinksdev server has a JWT validation endpoint built into the server. The client application can send a JWT to
this
endpoint and the server will fully validate it and return the JWT claims in the response. It will validate
all Registered JWT Claims.
Use of this endpoint is not network efficient, it would be ideal to validate the JWT locally. However, if the API client you are using does not have an adequate JWK Set and JWT validation library or are short on development time, this endpoint is ideal.
JWK Set Client Proxy (JCP)
An alternative to the JWT validation endpoint is a separate project
called JWK Set Client Proxy (JCP). JCP is a proxy server that can cache the JWK Set
from the magiclinksdev server and provide a REST API to validate JWTs.
Validating the JWT locally
It is ideal for client applications to validate JWTs locally to minimize network traffic. In this case, the client application is responsible for validating the JWT. Here are the steps required:
- Download the JWK Set from the server. (Caching for 1 hour is ideal.)
- Select the correct key from the JWK Set based on the
kidclaim in the JWT header. - Validate the same
algis used in the JWT header as the key selected from the JWK Set. - Cryptographically verify the JWT signature.
- Validate the Registered JWT Claims.
The magiclinksdev server will write a value to
all Registered JWT Claims except for sub, which is forced empty.
Each claim should be checked according to its entry
in RFC 7519 Section 4.1.
Every API client needs to validate the aud claim in the JWT. This is essential to prevent a malicious service
account from requesting a signed JWT for a different service. Every service account has at least one aud
given on creation. The iss claims should be checked too. The iss claim is specific to the configuration of the
magiclinksdev service, typically the URL.
Libraries for local validation
There are many libraries that can help with validating JWTs locally. If you know of other helpful libraries, open a GitHub issue with an example, and it may be added here.
Golang
Step 5: Client application marks the user as authenticated
The client application should mark the user as authenticated. For websites, this is typically done by storing the JWT in a cookie. Once a JWT storage method is chosen, it can be used by the user to perform authenticated requests for the client application. The client application should revalidate the JWT on each request.
Cookie recommendations
If you store the user's JWT in a browser cookie, it is essential to understand cookie security. Here is an OWASP cheatsheet for cookie security. Here's some other documentation from MDN.
Recommendations:
- If using persistent cookies, have
Max-Agebe set to expire after a reasonable amount of time. - Have
Domainset to something specific to the client application. - Have
Pathset. - Set the cookie as
Secure. - Set the cookie as
HttpOnly. - Have
SameSiteset toStrict.
Step 6: Refreshing the user's JWT (optional)
JWTs expire after a certain amount of time. If the client application wants to reauthenticate a user, it can resend a magic link. However, if a JWT is about to expire and the client application wants to continue treating a user as authenticated without interruption, this can be done through the server's JWT creation endpoint.
Please see the Specification documentation for details on how to form a request to the JWT creation endpoint.